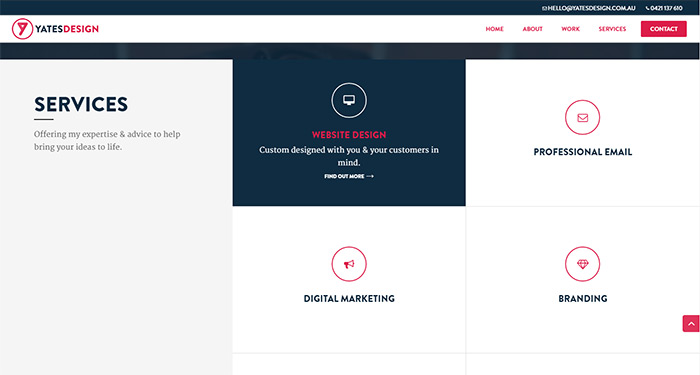
If you’d prefer to just skip the tutorial, you can download the layout and CSS in one handy little zip file. You can add the CSS code to your CSS file of choice or add it to Divi’s Custom CSS section (which can be found in Divi Theme Options > General tab > Custom CSS). To import the layout file follow this post on the Elegant Theme website.
This is the blurb title field
This is the blurb description field.
You should probably change it.
This is the blurb title field
This is the blurb description field.
You should probably change it.
This is the blurb title field
This is the blurb description field.
You should probably change it.
- Enable “Make This Row Fullwidth:”
- Enable “Use Custom Gutter Width:” & set it to “1”
- Set “Custom Padding” to 0
- Enable “Keep Custom Padding on Mobile:”
- In the Custom CSS tab, set the CSS Class to “blurb-hover”
In each column add a blurb module and a button module. The blurb module has the icon, title and text field, we’ll use the button module to handle the link so the link you place in the blurb module isn’t important. Set the link you want in the button module, the button text isn’t important as it will be hidden.
Once you’ve got all that set up correctly it should look something like this:
This is the blurb title field
You should probably change it.
This is the blurb title field
You should probably change it.
This is the blurb title field
You should probably change it.
/*Divi Blurb Module hover effects by yatesdesign.com.au*/
.blurb-hover .et_pb_column:hover {
background: #0f2c41;
}
.blurb-hover .et_pb_blurb p {
zoom: 1;
filter: alpha(opacity=0);
opacity: 0;
-webkit-transition: opacity .2s,-webkit-transform .35s;
transition: opacity .2s,transform .35s;
-webkit-transform: translate3d(0,40px,0);
transform: translate3d(0,40px,0);
}
.blurb-hover .et_pb_column:hover p {
color: #fff;
-webkit-transition-delay: .05s;
transition-delay: .05s;
-webkit-transition-duration: .35s;
transition-duration: .35s;
-webkit-transform: translate3d(0,0,0);
transform: translate3d(0,0,0);
zoom: 1;
filter: alpha(opacity=1);
opacity: 1;
}
.blurb-hover .et_pb_column:hover h4 {
color: #dc1d49;
-webkit-transform: translate3d(0,0,0);
transform: translate3d(0,0,0);
}
.blurb-hover .et_pb_blurb h4 {
-webkit-transition: -webkit-transform .35s;
transition: transform .35s;
-webkit-transform: translate3d(0,40px,0);
transform: translate3d(0,40px,0);
}
.blurb-hover .et_pb_column:hover .et-pb-icon {
background-color: transparent !important;
color: #fff !important;
border-color: #fff !important;
-webkit-transition-delay: .05s;
transition-delay: .05s;
-webkit-transition-duration: .35s;
transition-duration: .35s;
-webkit-transform: translate3d(0,0,0);
transform: translate3d(0,0,0);
}
.blurb-hover .et_pb_blurb .et-pb-icon {
background: transparent !important;
-webkit-transition-delay: .05s;
transition-delay: .05s;
-webkit-transition-duration: .35s;
transition-duration: .35s;
-webkit-transform: translate3d(0,0,0);
transform: translate3d(0,0,0);
-webkit-transform: translate3d(0,40px,0);
transform: translate3d(0,40px,0);
}
.blurb-hover .et_pb_column {
position: relative;
}
.blurb-hover .et_pb_button {
zoom: 1;
filter: alpha(opacity=0);
opacity: 0;
position: absolute;
top: 0;
left: 0;
width: 100%;
height: 100%;
}
[/css]
Thanks for reading!
If you found this post helpful you can show your appreciation by leaving a review on my Google Business listing.
If you need help…
I am available for hire! No matter how big or small your project is, I’d love to hear about it. All quotes are obligation free.