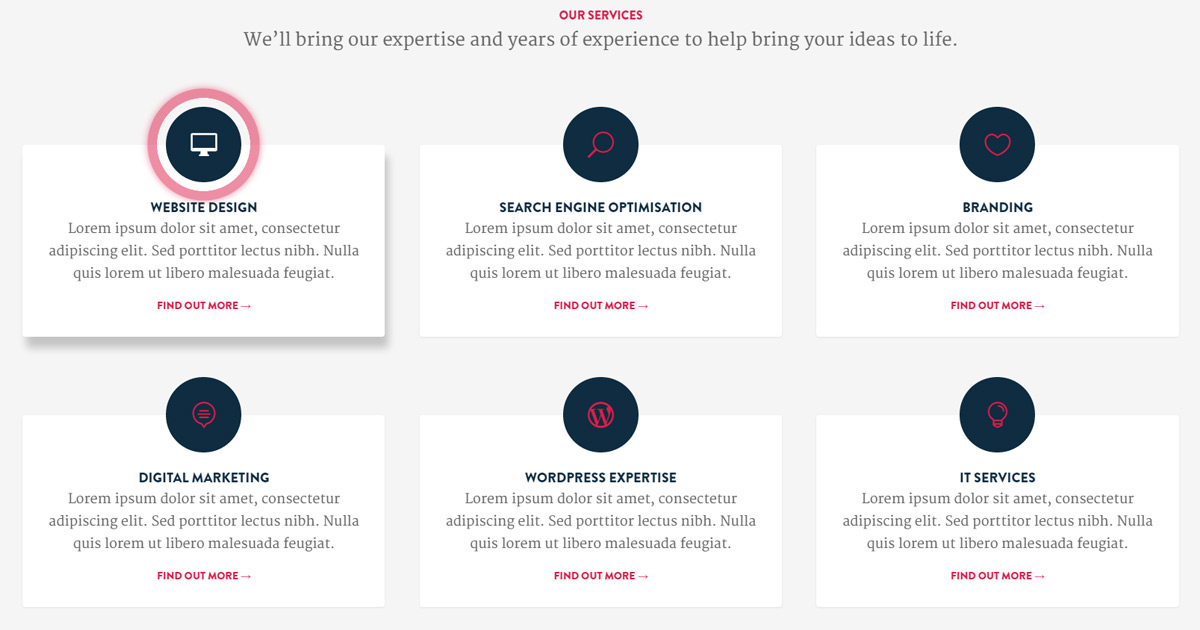
If you’d prefer to skip the tutorial, you can download the layout and CSS in one handy little zip file. In Divi 2.7 you can add Custom CSS to individual pages by clicking the hamburger icon at the top of The Divi Builder. To import the layout file follow this post on the Elegant Theme website.
Our Services
Website Design
Find out more →
Search Engine Optimisation
Find out more →
Branding
Find out more →
Digital Marketing
Find out more →
Wordpress Expertise
Find out more →
IT Services
Find out more →
OK! On to the tutorial.
Step 1
To start, add a section and set it’s background to #f5f5f5
Step 2
Add a row with 2, 3 or 4 columns & then use these settings:
- Enable “Make This Row Fullwidth:”
- Enable “Use Custom Gutter Width:” & set it to “2”
- In the Custom CSS tab, set the CSS Class to “blurb-card”
Step 3
Add a blurb module to each column and use these settings:
- Add a title & url
- Select Yes for use icon
- Set icon color to white
- Select Yes for Circle Icon
- Set the circle color to #0f2c41
- Set text orientation to center
- Add a description in the content section
Step 4
Add a button module to each column and add a url and title to each one (the title will be hidden but there needs to be some content in it)
Step 5
Add the following to your page’s Custom CSS. In Divi 2.7 you can add Custom CSS to individual pages by clicking the hamburger icon at the top of The Divi Builder.
[css]
.blurb-card .et_pb_main_blurb_image {
 margin-bottom: 0 !important;
}
.blurb-card h6 {
 color: #DC1D49;
 margin-top: 20px;
}
.blurb-card .et_pb_button {
 position: absolute;
 top: 0;
 left: 0;
 width: 100%;
 height: 100%;
 zoom: 1;
 filter: alpha(opacity=0);
 opacity: 0;
}
.blurb-card .et_pb_blurb {
 margin-bottom: 0 !important;
}
.blurb-card .et_pb_column {
 position: relative;
}
.blurb-card .et_pb_blurb_container {
 background: #fff;
 padding: 75px 25px 25px 25px;
 border-radius: 4px;
 box-shadow: 0px 1px 3px rgba(0, 0, 0, .08) !important;
 -webkit-box-shadow: 0px 1px 3px rgba(0, 0, 0, .08) !important;
 -moz-box-shadow: 0px 1px 3px rgba(0, 0, 0, .08) !important;
 -webkit-transition: all 0.1s linear;
 -o-transition: all 0.1s linear;
 -moz-transition: all 0.1s linear;
 -ms-transition: all 0.1s linear;
 -kthtml-transition: all 0.1s linear;
 transition: all 0.1s linear;
 margin-top: -50px;
}
.blurb-card .et_pb_column:hover .et_pb_blurb_container {
 -webkit-box-shadow: 5px 15px 15px rgba(0, 0, 0, .2) !important;
 -moz-box-shadow: 5px 15px 15px rgba(0, 0, 0, .2) !important;
 box-shadow: 5px 15px 15px rgba(0, 0, 0, .2) !important;
 -webkit-transition: all 0.1s linear;
 -o-transition: all 0.1s linear;
 -moz-transition: all 0.1s linear;
 -ms-transition: all 0.1s linear;
 -kthtml-transition: all 0.1s linear;
 transition: all 0.1s linear;
}
.blurb-card .et-pb-icon {
 padding: 33px;
 font-size: 35px;
 position: relative;
 z-index: 1;
 color: #dc1d49 !important;
 -webkit-transition: all 0.1s linear;
 -o-transition: all 0.1s linear;
 -moz-transition: all 0.1s linear;
 -ms-transition: all 0.1s linear;
 -kthtml-transition: all 0.1s linear;
}
.blurb-card .et-pb-icon:after {
 pointer-events: none;
 position: absolute;
 width: 100%;
 height: 100%;
 border-radius: 50%;
 content: '';
 -webkit-box-sizing: content-box;
 -moz-box-sizing: content-box;
 box-sizing: content-box;
}
.blurb-card .et-pb-icon:before {
 content: '';
 display: block;
}
.blurb-card .et-pb-icon {
 -webkit-transition: -webkit-transform ease-out 0.1s, background 0.2s;
 -moz-transition: -moz-transform ease-out 0.1s, background 0.2s;
 transition: transform ease-out 0.1s, background 0.2s;
}
.blurb-card .et-pb-icon:after {
 top: 0;
 left: 0;
 padding: 0;
 z-index: -1;
 box-shadow: 0 0 0 2px rgba(255, 255, 255, 0.1);
 opacity: 0;
 -webkit-transform: scale(0.9);
 -moz-transform: scale(0.9);
 -ms-transform: scale(0.9);
 transform: scale(0.9);
}
.blurb-card .et_pb_column:hover .et-pb-icon {
 color: #fff !important;
 -webkit-transition: all 0.1s linear;
 -o-transition: all 0.1s linear;
 -moz-transition: all 0.1s linear;
 -ms-transition: all 0.1s linear;
 -kthtml-transition: all 0.1s linear;
}
.blurb-card .et_pb_column:hover .et-pb-icon:after {
 -webkit-animation: sonarEffect 0.5s ease-out 50ms;
 -moz-animation: sonarEffect 0.5s ease-out 75ms;
 animation: sonarEffect 0.5s ease-out 75ms;
}
@-webkit-keyframes sonarEffect {
 0% {
 opacity: 0.3;
 }
 40% {
 opacity: 0.5;
 box-shadow: 0 0 0 2px #dc1d49, 0 0 10px 10px #dc1d49, 0 0 0 10px #dc1d49;
 }
 100% {
 box-shadow: 0 0 0 2px #dc1d49, 0 0 10px 10px #dc1d49, 0 0 0 10px #dc1d49;
 -webkit-transform: scale(1.5);
 opacity: 0;
 }
}
@-moz-keyframes sonarEffect {
 0% {
 opacity: 0.3;
 }
 40% {
 opacity: 0.5;
 box-shadow: 0 0 0 2px #dc1d49, 0 0 10px 10px #dc1d49, 0 0 0 10px #dc1d49;
 }
 100% {
 box-shadow: 0 0 0 2px #dc1d49, 0 0 10px 10px #dc1d49, 0 0 0 10px #dc1d49;
 -moz-transform: scale(1.5);
 opacity: 0;
 }
}
@keyframes sonarEffect {
 0% {
 opacity: 0.3;
 }
 40% {
 opacity: 0.5;
 box-shadow: 0 0 0 2px #dc1d49, 0 0 10px 10px #dc1d49, 0 0 0 10px #dc1d49;
 }
 100% {
 box-shadow: 0 0 0 2px #dc1d49, 0 0 10px 10px #dc1d49, 0 0 0 10px #dc1d49;
 transform: scale(1.5);
 opacity: 0;
 }
}


[/css]
That’s it! I’d love to hear about any successes or failures you have with this. Email me at hello@yatesdesign.com.au.
Thanks for reading!
If you found this post helpful you can show your appreciation by leaving a review on my Google Business listing.
If you need help…
I am available for hire! No matter how big or small your project is, I’d love to hear about it. All quotes are obligation free.